TL;DR
Reduce packaging costs by right-sizing boxes, removing unnecessary materials, choosing suitable board strength, and ordering realistic quantities. Compare the total cost of packaging, labor, shipping, and damage—not just the box price. Keep branding simple and test changes with the actual product so savings do not reduce protection or brand value.
Cut Packaging Costs Without Cutting What Matte
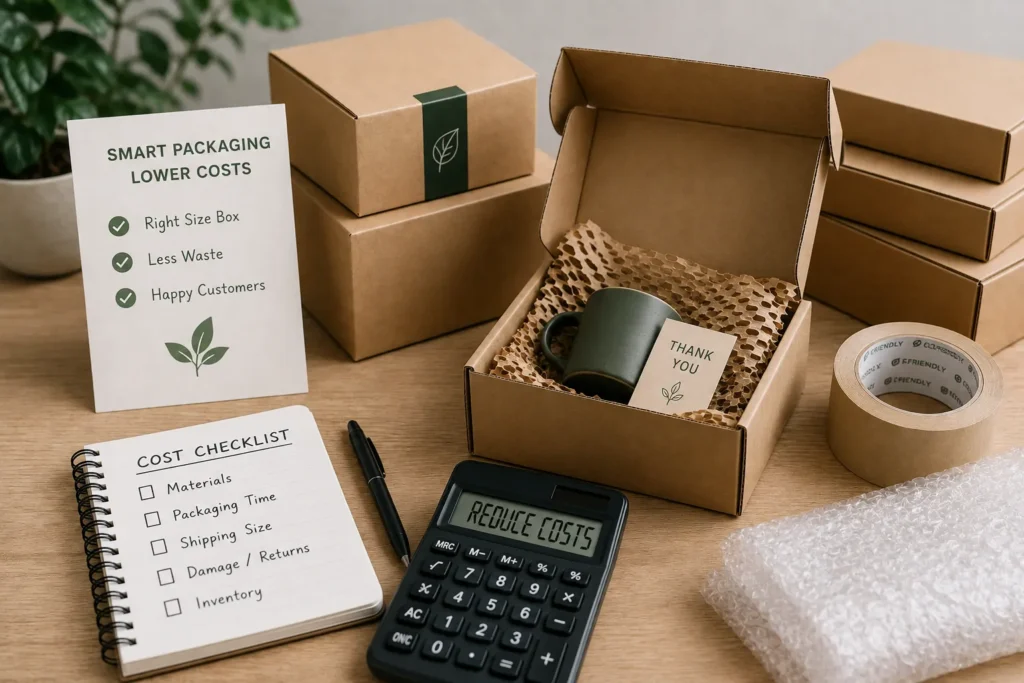
Reducing packaging costs does not mean choosing the cheapest box and hoping it survives shipping. For most small businesses, better savings are found in oversized boxes, unnecessary packing materials, complicated branding, and quantities that do not match actual sales.
The box price is only one part of the cost. Inserts, filler, tape, packing time, shipping dimensions, damaged products, and unused inventory all affect what you eventually spend on each order.
If you are working out how to reduce packaging costs, start with the complete packed order. Look for spending that can be removed without making the product harder to pack, less protected, or poorly presented when it reaches the customer.
Find Out What Each Order Really Costs to Pack
Before changing the box, find out where your current packaging budget is going.
A useful starting point is:
Materials include the box as well as inserts, tissue, tape, labels, and void fill. Packing labor matters too. A box that saves a few cents but takes 1 extra minute to assemble and fill may not be the better option once that additional time is repeated across hundreds of orders.
Shipping is another part of the calculation. A box that is much larger than the product can increase the amount of material and filler you use while also creating larger shipping dimensions.
Then look at damage. If a cheaper box leads to more crushed corners, broken products, or replacements, the initial saving is being lost somewhere else.
This is why comparing box prices alone can be misleading. Review the cost after the product is packed and ready to ship. That gives you a much clearer picture of where packaging cost reduction can actually make a difference.
Right-Size the Box Before Cutting Material
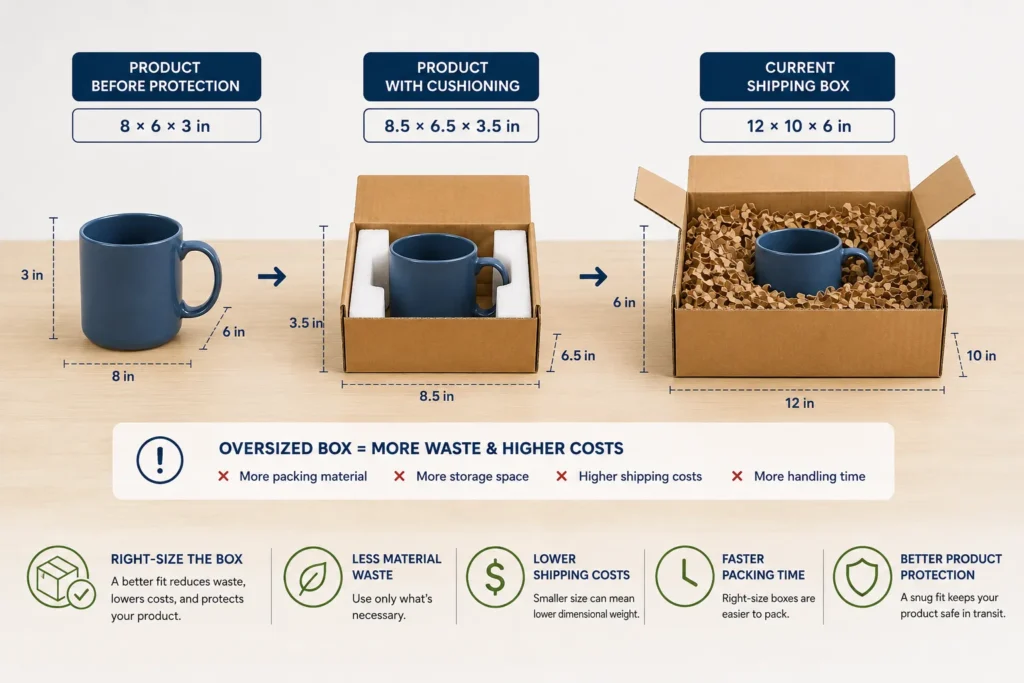
Oversized boxes are a good place to look for waste because one sizing problem can affect material, filler, storage, and shipping at the same time.
Consider a product with these dimensions:
- Product before protection: 8 × 6 × 3 inches
- Product with required cushioning: about 8.5 × 6.5 × 3.5 inches
- Current shipping box: 12 × 10 × 6 inches
If the protected product only needs a little clearance, the current box leaves a considerable amount of unused room. Staff may then have to add filler simply to stop the product moving inside a box that was too large to begin with.
The outside dimensions matter too. U.S. carriers may use dimensional weight for eligible shipments, which means the space a shipping box occupies can influence billable weight as well as actual weight. Carrier rules vary by service and can change, so current requirements should be checked when calculating shipping costs.
Measure the product after adding any insert, wrap, or cushioning that will remain around it during shipping. The box should provide enough clearance for easy packing and safe transit without leaving space that has no useful purpose.
For products shipped regularly, custom shipping boxes sized closer to the packed product may be worth comparing with available stock sizes. For low-volume products, a well-fitting stock box can still be the more practical choice.
The useful comparison is not stock versus custom. It is which option gives the product the right fit and protection at the better total cost.
Cut Out Unnecessary Packaging Layers
Once the box size is under control, look at what goes inside it.
A typical order may include a product carton, insert, tissue, void fill, printed card, tape, and an outer shipping box. Some of these materials protect the product or improve presentation. Others may simply have remained part of the packing routine long after their original purpose disappeared.
Each item should have a reason for being there. It should protect the product, hold it in place, close the box securely, provide information the customer needs, or make a worthwhile contribution to presentation.
If it does none of those things, it is worth reviewing.
Void fill is a good example. Removing filler from an oversized box does not solve the problem if the product then moves freely during shipping. Reducing unnecessary space first may allow you to use less filler while keeping the product secure.
This is a more useful approach to packaging waste reduction than removing materials without considering why they were being used.
Protection still comes first where it is needed. Glass bottles, ceramics, and other fragile products may require inserts or cushioning around vulnerable areas. Soft apparel and other low-risk products have very different needs.
The goal is to remove excess, not the material that is preventing damage.
Choose Material for the Product and How It Ships
Material choice should start with what is being packed and what happens to the box after it leaves your facility.
Consider two very different products:
- Glass bottle set: around 2 lb when packed
- Light apparel item: around 6 oz when packed
The bottle set places more pressure on the base and side walls and may need an insert to control movement. The apparel item is lighter and far less vulnerable to breakage. Giving both products the same heavy packaging specification may mean paying for strength the lighter product does not need.
How the box travels matters as well. A folding carton placed inside a separate shipping box has a different job from a corrugated mailer that travels directly through a parcel network.
This is something worth checking when comparing material quotes. Two boxes can have similar dimensions and appearance but perform differently once product weight, stacking, and handling are involved.
Material that is too weak can lead to bending, crushed corners, or failed closures. Material that is much stronger than necessary adds cost without automatically improving protection.
For some e-commerce orders, custom mailer boxes can combine presentation and shipping protection in one structure. Heavier or more demanding shipments may require corrugated packaging selected around the product weight and handling conditions.
When considering a different board or lighter material, test it with the actual product inside. An empty box can feel strong on a desk and behave differently once it is filled, stacked, and handled.
Keep the Branding Customers Actually Notice
Cutting packaging expenses does not mean removing your brand from the box.
A clean design with a clear logo, good spacing, and a consistent color can look more considered than a box covered with several decorative finishes. The question is where your branding budget creates the most visible difference.
Depending on the product, that could be:
- a one-color printed design;
- a branded sticker or seal;
- a simple printed insert;
- minimal printing on kraft packaging.
Think about where the customer actually sees the branding. If the outside of a shipping box is likely to collect marks during delivery, paying for elaborate artwork across every exterior panel may not give you much return. Keeping the outside simple and placing a stronger branded detail inside can sometimes create a better opening experience for less.
The same thinking applies to finishes. Foil, spot effects, specialty coatings, and other upgrades can be useful when they support the product positioning, but they do not all need to appear on the same box.
Premium packaging on a budget works best when the design looks intentional rather than stripped down.
Reduce Box Sizes Without Creating More Empty Space
Too many box sizes can make packaging inventory harder to buy, store, and manage.
Suppose your range currently looks like this:
- Products: 8
- Separate box sizes: 8
- Possible box sizes after reviewing fit: 4
If several products have similar packed dimensions, weight, and protection requirements, sharing a box size can simplify ordering and storage. It may also concentrate more purchasing volume into specifications you use regularly.
But fewer sizes are only useful when the fit still works.
Putting a 5-inch product into a box designed for a 10-inch item may require extra filler just to stop movement. The storage system becomes simpler, but individual orders become less efficient.
Group products according to their actual packed dimensions rather than trying to force every SKU into the smallest possible number of box sizes.
Standardization should remove unnecessary variation, not create unnecessary empty space.
Compare the Total Cost, Not Just the Supplier’s Unit Price
A packaging quote can look inexpensive until you see what is included and what is not.
When comparing suppliers, make sure the quotes are based on the same dimensions, material specification, printing requirements, and quantity. Then consider setup or tooling charges, freight, and lead time.
This is particularly important when two quotes appear close. A lower unit price does not tell you much if one quote uses a different board specification or leaves freight out of the comparison.
Order quantity deserves the same attention.
For example:
- Expected use: about 1,000 boxes over the next few months
- Better unit-price tier: 5,000 boxes
- Additional inventory: 4,000 boxes
Ordering 5,000 could make sense for an established product with stable sales and artwork. It becomes harder to justify if the product is new, demand is uncertain, or the box design may change.
A lower unit price only produces a saving when you use the boxes.
The same principle applies to minimum order quantity (MOQ) and packaging supplier pricing. Consider what the order costs by the time it reaches your facility and how long the inventory is likely to remain there.
Buying strategically is better than buying more simply because the price per box is lower.
Test the Smaller Box With the Actual Product
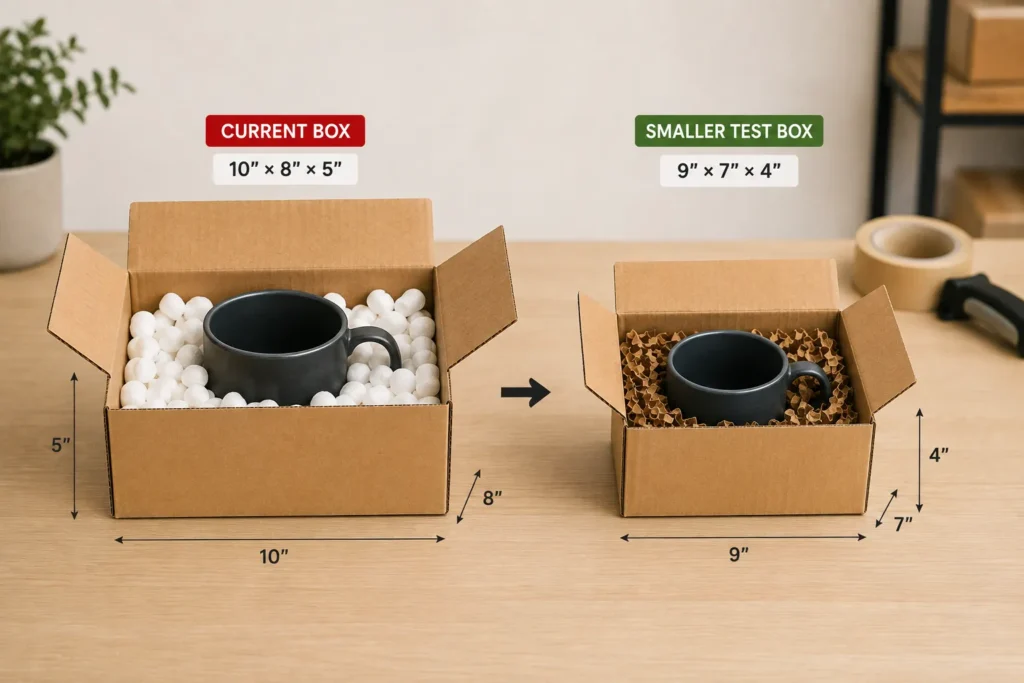
A new box should be tested with the product before you commit to a larger order.
Imagine you are considering this change:
- Current shipping box: 10 × 8 × 5 inches
- Smaller test box: 9 × 7 × 4 inches
The smaller size looks more efficient, but the measurements alone do not tell you whether it works.
Pack the product exactly as you would for a customer. Check whether it loads easily, whether the required cushioning still fits, and whether any fragile area is pressed against the side walls. Close the box and check how much movement remains inside.
Then compare it with the current box. If the smaller size uses less filler, takes no longer to pack, and keeps the product properly protected, the change has a clear practical benefit.
If staff have to force the product inside or add awkward packing steps, you may have reduced the dimensions too far.
Testing before a larger production run is especially useful when changing dimensions, inserts, or board strength. It gives you a chance to find fit and handling problems before they become an inventory problem.
That is what cost-effective packaging should do: remove unnecessary expense without introducing another cost during fulfillment.
Avoid Savings That Move the Cost Somewhere Else
Some packaging cuts do not actually remove a cost. They simply move it.
A weaker box may reduce the material bill but increase damage. An oversized box bought cheaply may require more filler and shipping space. Removing useful cushioning can result in replacements. Ordering too much inventory can leave you with boxes that no longer fit the product or artwork.
Branding can be cut too far as well. You may not need several decorative finishes, but removing every recognizable detail can weaken presentation when the box is part of the buying experience.
Before cutting an expense, ask:
If we save money here, what changes elsewhere?
If the product remains protected, packing stays efficient, shipping does not become more expensive, and the presentation still fits the brand, you may have found a genuine saving.
If one of those areas gets noticeably worse, there is probably a better place to reduce the cost.
Check Your Packaging Before the Next Reorder
You do not need a full packaging redesign every time you want to reduce packaging expenses. A quick review before reordering can uncover problems that have gradually become part of the normal packing process.
Check whether:
- the box is reasonably close to the packed product dimensions;
- filler is being used mainly because the box is too large;
- every insert, wrap, card, or layer still has a purpose;
- the material matches the product’s weight and protection needs;
- similar products can share a box size without creating excess space;
- supplier quotes are based on comparable specifications;
- the quantity matches what you can realistically use;
- the final box has been tested with the actual product.
Start with the clearest source of waste rather than changing everything at once. That makes it easier to see whether the adjustment genuinely reduces the total cost of packing and shipping an order.
Reduce the Cost Without Reducing the Value
The best way to reduce packaging costs is to remove waste before removing quality.
Start with the fit. A right-sized box can reduce unnecessary material, filler, and shipping volume at the same time. Then look at material strength, packing layers, branding, and order quantities to see where spending can be simplified without creating another problem.
Use actual product dimensions and test meaningful changes before placing a larger order. Those simple checks make it easier to tell the difference between a lower box price and a genuine reduction in total packaging cost.
If you are reviewing your current packaging, Hello Custom Boxes USA can help you compare box sizes, materials, printing options, and quantities around the way your products are actually packed and shipped. You can also review relevant custom box options or request a packaging quote once you know the dimensions, product weight, quantity, and level of printing you actually need.
The aim is to find affordable custom packaging that protects the product and keeps the brand presentation where it matters.
Frequently Asked Questions
Start with box size, unnecessary packing materials, material choice, packing time, and shipping dimensions. These areas can reveal savings without immediately reducing protection or removing branding that customers notice.
No. A stock box can be a practical choice for low or unpredictable volumes when the size fits well. Custom packaging becomes worth comparing when better dimensions can reduce wasted material, improve packing efficiency, or support a product that ships regularly.
An oversized shipping box uses more material and creates greater shipping volume. Box dimensions can also influence billable weight when dimensional-weight pricing applies, which is why unnecessary length, width, and height are worth reviewing.
A one-color print, branded sticker or label, or simple printed insert can provide clear brand recognition without using several decorative finishes. Choose the element customers are most likely to see rather than adding branding everywhere.
Not necessarily. Higher quantities may reduce the unit price, but the saving only works when you use the inventory. Changes to demand, product dimensions, or artwork can turn excess boxes into an unnecessary expense.